Pizza Pie: 7 Steps to the Best DIY Version
There’s nothing quite like the love people share for a fresh, hot homemade pizza. The smell of bubbling cheese, rich tomato sauce, and golden, crispy crust baking in the oven is enough to make anyone’s mouth water. A pizza pie isn’t just a meal — it’s an experience, a celebration of simple ingredients coming together to create something truly unforgettable.
The best part? You don’t need to be a professional chef or have fancy equipment to make an incredible pizza pie at home. With just a handful of basic ingredients like all-purpose flour, olive oil, and fresh mozzarella cheese — and a few easy techniques — you can craft a pizza that rivals your favorite local pizzeria. It’s a rewarding process that not only fills your kitchen with amazing aromas but also gives you full control over every topping and flavor.
In this blog post, I’ll walk you through a simple, foolproof 7-step process to create the ultimate DIY pizza pie. Whether you love a classic pepperoni topping or prefer experimenting with fresh basil and parmesan, you’ll soon discover just how fun, easy, and delicious homemade pizza can be. Let’s dive in!
Table of Contents
Step 1 – Gather the Essentials: Key Ingredients and Tools
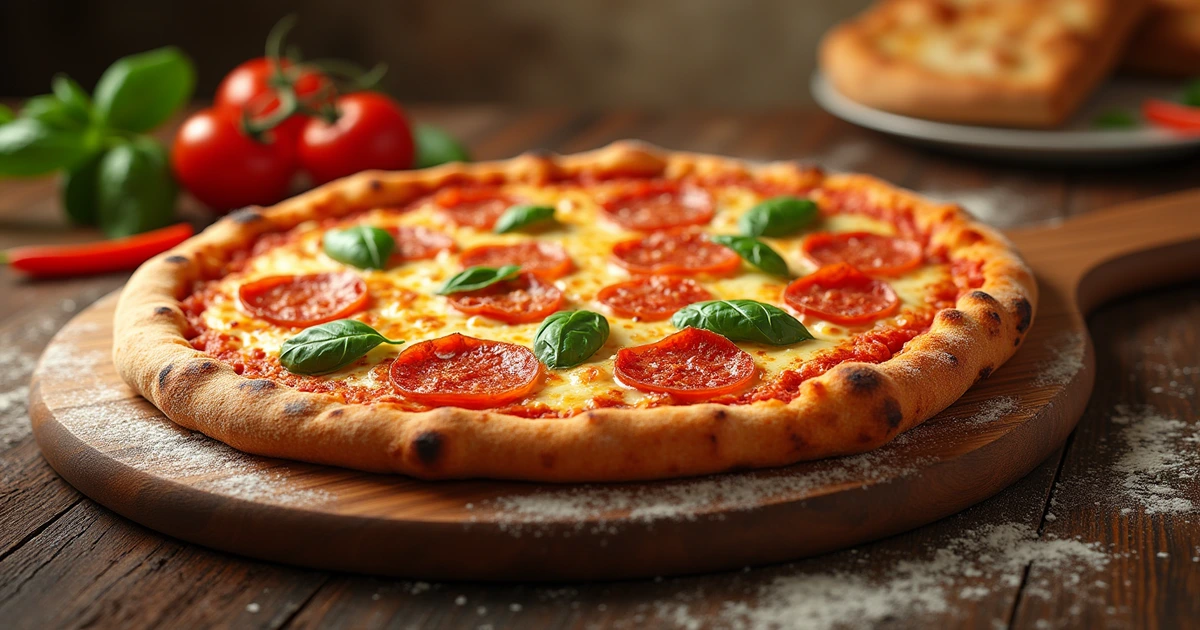
Pepperoni – A Timeless Favorite for Topping
When it comes to pizza toppings, pepperoni holds a special place in almost everyone’s heart. Its rich, slightly spicy flavor and the way it crisps and curls at the edges while baking make it a must-have for many homemade pizza pies. Adding pepperoni brings a satisfying savory kick that pairs beautifully with creamy mozzarella cheese and a vibrant marinara or tomato sauce base.
For the best results, look for high-quality pepperoni that’s made with natural spices and minimal fillers — the flavor difference is noticeable. Some even prefer slicing their own from a whole pepperoni stick for an even fresher taste. As it bakes, pepperoni releases flavorful oils that seep into the cheese and crust, creating irresistible little pockets of flavor. Whether you love your pizza loaded with pepperoni or just dotted with a few slices, this topping adds that comforting, familiar taste that truly defines a classic pizza pie experience.
Baking Sheet – A Reliable Alternative to a Pizza Stone
While a pizza stone is fantastic for achieving a crisp, pizzeria-style crust, not everyone keeps one in their kitchen. Fortunately, a baking sheet offers an excellent alternative that still delivers outstanding homemade pizza results. A sturdy, heavy-duty baking sheet can handle high oven temperatures and provides a solid surface for even baking.
To get the best crust using a baking sheet, preheat it in the oven while you’re assembling your pizza. This little trick mimics the effect of a pizza stone, giving your crust a nice initial blast of heat that helps it puff up and crisp on the bottom. Lightly oil the baking sheet or sprinkle a bit of cornmeal or flour over it to prevent sticking and add a subtle crunch.
A baking sheet also offers versatility — you can make traditional round pizzas, rustic oblong shapes, or even a hearty sheet pan pizza for feeding a crowd. With a good baking sheet and a little attention to oven temperature, you can create a pizza pie that’s every bit as golden, crispy, and satisfying as one baked on a stone.
Step 2 – Make the Perfect Homemade Pizza Dough


Mixing Your Dough – The First Step to Pizza Perfection
Creating the perfect pizza dough starts with mixing your ingredients with care. In a large bowl, combine your all-purpose flour, active dry yeast (already activated with warm water and a pinch of sugar), olive oil, and a bit of salt. Use a wooden spoon or your hands to mix everything until the dough starts to come together.
At this stage, don’t worry if it looks a little rough or shaggy — that’s completely normal. The key is making sure all the flour is hydrated and that no dry pockets remain. A gentle hand is important here; overmixing can lead to tough dough. Think of it as the foundation for your pizza pie: the more love you put into this step, the better your final crust will be. Once it forms a loose ball, you’re ready to knead!
Kneading the Dough – Building Strength and Texture
Kneading is where the magic really happens. This process develops the gluten structure that gives your pizza dough its wonderful chew and stretch. Lightly flour your work surface and begin pressing and folding the dough with the heels of your hands, rotating it a little with each push.
You’ll notice the dough becoming smoother and more elastic as you knead — that’s the gluten working! Aim to knead for about 8 to 10 minutes, adding a tiny sprinkle of flour if the dough feels too sticky. It should be soft, slightly tacky but not wet, and able to hold its shape when formed into a ball. Take your time here; good kneading sets the stage for a light, airy crust that’s a joy to bite into.
Letting the Dough Rest – Unlocking Flavor and Lightness
Once kneading is done, it’s time for the dough to rest and rise, a critical step in creating a flavorful, light crust. Place your dough ball in a lightly oiled bowl, cover it with a damp cloth or plastic wrap, and let it rise in a warm, draft-free spot. This is when the yeast gets to work, producing carbon dioxide bubbles that will puff up the dough beautifully.
Depending on your kitchen temperature, the first rise usually takes about 1 to 2 hours — you’re looking for the dough to double in size. For even deeper flavor, you can opt for a slower, overnight rise in the refrigerator. Resting not only helps the dough develop complex, slightly tangy flavors, but it also makes it easier to stretch and shape later without tearing. A patient rise is one of the true secrets to a memorable homemade pizza pie.
Step 3 – Craft a Flavorful Homemade Pizza Sauce
Choosing Between Marinara and Tomato Sauce – Finding Your Perfect Base
When it comes to building the flavor of your homemade pizza pie, choosing the right sauce base makes all the difference. Two popular options are marinara sauce and simple tomato sauce, and each brings its own unique character to your pizza.
Marinara sauce is rich, chunky, and full of bold flavors like garlic, onion, and Italian herbs. It gives your pizza a rustic, hearty feel, especially if you enjoy a sauce that stands out against the cheese and toppings. On the other hand, tomato sauce is smoother, lighter, and a bit more subtle, allowing the toppings and cheese to shine while still adding a fresh, bright tomato flavor.
Both options are wonderful — it simply depends on your personal preference. If you’re craving something robust and comforting, marinara is the way to go. If you want a more delicate balance that lets every topping have its moment, tomato sauce might be your best bet. Either way, starting with high-quality canned tomatoes or fresh tomatoes will ensure your sauce tastes vibrant and delicious.
Seasoning Your Sauce – The Secret to Irresistible Flavor
No matter which base you choose, seasoning your pizza sauce is where you truly create magic. A few simple additions can transform basic tomatoes into a mouthwatering foundation for your pizza pie.
Start by gently simmering your sauce with a splash of olive oil to add richness. Then stir in classic seasonings like Italian seasoning, salt, pepper, and a pinch of sugar to balance the acidity of the tomatoes. If you’re using marinara, you might also add extra garlic or a touch of crushed red pepper for a little heat. Fresh herbs like basil or oregano bring a beautiful brightness to the sauce, especially if stirred in just before spreading it on your dough.
The key is to taste as you go — your sauce should be bold enough to stand up to the cheese and toppings, but not so overpowering that it steals the show. When seasoned properly, your homemade sauce will tie every element of your pizza together, delivering a truly irresistible flavor in every bite.
Step 4 – Build and Customize Your DIY Pizza Pie
Rolling Out the Dough – Achieving the Perfect Crust
Rolling out your pizza dough is one of the first and most important steps in building the perfect DIY pizza pie. The goal is to achieve a balanced crust — not too thin and crispy, and not too thick and doughy. The process begins with lightly flouring your work surface and rolling pin to prevent sticking. Take your dough ball, and gently press it down into a rough circle with your fingers, creating a flat, even base.
Once you have the initial shape, it’s time to roll. Use the rolling pin to gradually extend the dough outward, rotating it with each pass to maintain an even thickness. Don’t rush this step! For a more crispy crust, roll the dough thinner so it cooks faster and has that perfect crunch. If you prefer a more chewy and airy base, keep the dough a little thicker and allow it to rise slightly more as it bakes.
If you’re looking for a more rustic look, skip the rolling pin altogether! Instead, gently stretch the dough by hand, using your fingers and knuckles to pull it outward. This method can create a more artisanal feel with bubbles and irregularities in the dough that add character. Once you’re happy with your dough’s shape and thickness, transfer it carefully to a pizza stone or baking sheet to prep it for the next delicious steps.
Layering Sauce and Cheese – Building Flavor from the Bottom Up
Now that your dough is shaped and ready, it’s time to layer your sauce and cheese, the heart and soul of your pizza pie. Start by spreading your homemade pizza sauce over the dough, making sure to leave a small border around the edges for the crust. The amount of sauce you spread depends on how saucy you want your pizza — just a thin layer for a light pizza, or a more generous amount if you prefer a saucy bite.
As you spread the sauce, ensure it’s even, reaching all corners of the dough. Don’t go overboard, as too much sauce can make the pizza soggy — you want a nice, balanced layer that complements the other toppings.
Next, sprinkle your mozzarella cheese evenly over the sauce, ensuring that every bite will have that perfect melty texture. For a smoother, creamier melt, use fresh mozzarella, which melts beautifully and creates a rich, luxurious texture. If you prefer a more stretchy, classic pizza experience, shredded mozzarella is perfect. For an added layer of flavor, don’t hesitate to mix in some parmesan or even fontina for a slightly sharper, more complex flavor profile.
When layering cheese, be sure to spread it evenly across the pizza for a uniform melt, but feel free to add a little extra cheese around the edges for a crispy, cheesy crust. The key is balance: you want just enough cheese to create a gooey layer without overwhelming the sauce and toppings.
Customizing Your Toppings – Make It Your Own
One of the most exciting things about creating your DIY pizza pie is the ability to customize your toppings to reflect your own tastes and preferences. This is where you can really get creative and experiment with flavors, textures, and colors that will make your pizza unique. The choice of toppings is entirely up to you — from classic favorites to innovative gourmet options, your pizza is your canvas!
Start with the essentials — think pepperoni, sausage, mushrooms, and green peppers. These ingredients offer a perfect balance of savory, meaty, and fresh flavors that are crowd-pleasers every time. However, don’t be afraid to get a little adventurous. Add arugula for a peppery freshness, toss on prosciutto for a salty, melt-in-your-mouth bite, or try some sun-dried tomatoes for a tangy twist.
Consider incorporating seasonal or fresh ingredients like fresh basil, roasted garlic, or even sliced figs for a touch of sweetness. For those who like a bit of heat, jalapeños or a sprinkle of crushed red pepper flakes can give your pizza a spicy kick. And let’s not forget about those gourmet options like goat cheese, caramelized onions, or a drizzle of balsamic glaze after baking — these toppings elevate your pizza to a whole new level.
When adding toppings, aim for balance. You don’t want to overstuff the pizza with too many ingredients, as it could make it soggy or cause uneven baking. Instead, choose a few key toppings that complement each other. You can always experiment with different combinations and styles, but keep in mind that simplicity is often key to a perfect pizza.
Step 5 – Bake Like a Pro and Serve Hot
Preheating the Oven – The Secret to a Crispy Crust
The key to a crispy, golden crust is the preheating step. A properly preheated oven ensures that the dough begins to cook immediately upon entering, resulting in a crispy crust without over-drying or undercooking the toppings. Aim to preheat your oven to a high temperature — around 475°F to 500°F (245°C to 260°C), depending on your oven’s capabilities.
If you’re using a pizza stone, preheat it along with the oven to give it time to absorb the heat. The stone will then work its magic by distributing heat evenly across the pizza, creating a crisp, pizzeria-style bottom. For the best results, let the stone heat for at least 30 minutes before you add your pizza. A pizza stone also helps prevent sogginess, especially with saucy toppings like fresh tomatoes or mozzarella.
If you don’t have a pizza stone, no worries — a baking sheet works just as well. Simply place your prepared pizza on the sheet and slide it into the hot oven. A properly preheated oven is the foundation for crisping the crust and baking the toppings evenly, so don’t skip this step!
Baking Your Pizza – Achieving the Perfect Golden Crust
Once your oven is preheated, the moment of truth has arrived — it’s time to bake your pizza. Whether you’re using a pizza stone or baking sheet, gently place the prepared pizza into the oven, ensuring it doesn’t touch the walls or other surfaces. It’s best to bake your pizza in the middle rack of the oven to ensure even heat distribution.
As the pizza bakes, the cheese will begin to bubble, turning a golden brown, and the crust will transform into the perfect combination of crispy on the outside and soft on the inside. The baking time usually takes about 10 to 15 minutes, but this can vary depending on the thickness of your dough and the oven temperature. Keep a close eye on your pizza, especially in the last few minutes of baking.
For a crispy crust, you may want to extend the baking time by 1-2 minutes, ensuring the crust is golden and slightly charred in some places. If you’re making a thicker crust pizza or adding heavier toppings, you might need an additional few minutes. It’s always a good idea to lift a corner of the pizza with a spatula to check the bottom of the crust — it should be crispy and golden brown, not soft or doughy. If you’re using a pizza stone, the heat will be more intense, so you may want to check the pizza slightly earlier.
Serving Your Pizza – The Moment You’ve Been Waiting For
Once your pizza is baked to golden, bubbling perfection, it’s time to serve and enjoy the fruits of your labor. Carefully remove the pizza from the oven, using oven mitts or a pizza peel to prevent any burns. Let the pizza sit for a minute or two to cool slightly — this helps the cheese set a bit and makes it easier to slice without it all sliding off.
Now, slice your pizza using a pizza cutter or a sharp knife for clean, even cuts. You can cut it into classic triangular slices, or if you’re making a sheet pan pizza, cut it into squares for a fun, shareable serving style. If you like, sprinkle some fresh basil leaves or a drizzle of extra virgin olive oil on top for a burst of freshness and flavor right before serving.
For an extra touch, you can finish your pizza with a sprinkling of parmesan cheese for a savory, umami-packed flavor. For those who enjoy a little heat, crushed red pepper flakes can add a touch of spice, or a drizzle of hot honey adds a sweet contrast to balance the savory flavors. If you made a gourmet pizza, you might even add some arugula or a drizzle of balsamic glaze after baking to give it an extra layer of complexity and freshness.
Now comes the best part — eating it! Gather your friends and family, or simply enjoy the indulgence of a freshly made pizza. With every bite, the crunchy crust, gooey cheese, and perfectly paired toppings will leave you wanting more. The beauty of DIY pizza is the satisfaction of knowing it’s made just how you like it.
Conclusion
Relishing the Joy of Homemade Pizza Pie – A Truly Rewarding Experience
There’s something incredibly satisfying about creating your own pizza pie from scratch. The joy of watching your dough transform into a crispy, golden crust, and then building your masterpiece with fresh, flavorful toppings, is an experience that can’t be matched by store-bought pizzas. Not only do you get to enjoy the delicious result, but the process itself is a fun and fulfilling activity that can bring family and friends together to enjoy a pizza pie like no other.
Making pizza pies at home allows you to get creative in the kitchen, experimenting with different combinations of toppings, cheeses, and sauces to suit your taste perfectly. Whether you prefer a classic margherita pizza pie or something more adventurous like BBQ chicken or a veggie supreme, the possibilities are endless. Every bite of your DIY pizza pie is a reflection of your personal touch and culinary skills — making it a truly rewarding experience every time you create one.
So, whether you’re making a pizza pie for a special occasion, a family night, or just because you’re craving something delicious, take a moment to appreciate the love and care that goes into every homemade pie.
Tailor Your Pizza Pie to Your Taste – Endless Customization Options
One of the most exciting aspects of making your own pizza pie is the freedom to customize it to your exact liking. Unlike ordering from a pizzeria, where you’re limited to standard menu options, making a pizza pie at home means you can create a unique flavor profile every single time. Want a crispy crust or a thicker, chewier one? Prefer fresh basil over dried, or maybe you like a mix of cheeses? You can make all these decisions to suit your taste preferences.
Customizing your pizza pie also gives you the chance to experiment with different flavors and ingredients. From savory toppings like pepperoni and sausage to fresh veggies, herbs, and even fruit (hello, pineapple!), you’re in complete control. Want to try a gourmet pizza pie? Add goat cheese, truffle oil, or caramelized onions for a sophisticated touch. The best part is that you can tailor your pizza pie to match your mood or dietary needs, whether that’s a vegetarian pizza, a gluten-free crust, or even a low-carb option.
Making a pizza pie at home gives you the power to shape your meals exactly the way you like them. There are no limits to your creativity — only the boundaries of your taste buds.
Share the Love – Pizza Pie Is Perfect for Every Occasion
Pizza pie is more than just food; it’s an experience that brings people together. Whether you’re hosting a casual dinner, a game night, or a celebration, pizza pie is the perfect dish to share with loved ones. There’s something about gathering around a homemade pizza pie that sparks conversation, laughter, and the feeling of being connected over a delicious meal.
Homemade pizza pie is also a wonderful activity for family bonding. Kids love to get involved in the process, from rolling out the dough to choosing their favorite toppings. It’s an opportunity for everyone to get creative in the kitchen while enjoying quality time together. Plus, there’s no need to worry about picky eaters — since each person can create their own pizza pie, everyone gets exactly what they want.
Pizza pie is versatile enough for every occasion, whether it’s a laid-back weeknight dinner or a fun pizza-making party. It’s a meal that’s meant to be shared, savored, and enjoyed together. So next time you’re looking for a meal to bring joy to your family or guests, don’t hesitate to break out your pizza dough and get to work — it’s a surefire way to create lasting memories.