7 Outstanding Kitchen Sink Crumbl Cookie Tips for Bakery-Quality Results
If you’ve ever tasted a Kitchen Sink Crumbl Cookie, you know it’s pure magic in every bite — packed with gooey chocolate chips, crunchy pretzels, sweet toffee bits, and a sprinkle of flaky sea salt that ties it all together. These bakery-sized cookies are famous for their rich, indulgent flavor and unforgettable texture. Thanks to Crumbl Cookies, the world has fallen in love with these soft, chewy creations that combine everything delicious “but the kitchen sink.”
The best part? You don’t have to wait for your next Crumbl run to enjoy them. With the right ingredients, techniques, and a few insider secrets, you can easily bake bakery-quality Kitchen Sink Crumbl Cookies right in your own kitchen. Whether you’re aiming for perfectly thick cookies with gooey centers or that golden, slightly crisp edge, mastering these copycat cookies is easier than you might think.
In this post, I’ll share 7 outstanding tips that guarantee delicious, professional-level results every time. From choosing the best mix-ins to avoiding common baking mistakes, you’ll learn everything you need to know to create the ultimate homemade Kitchen Sink Crumbl Cookie. Let’s dive in and start baking cookies that will impress your family, friends, and — most importantly — yourself!
Table of Contents
What Makes the Kitchen Sink Crumbl Cookie So Irresistible


A Perfect Balance of Sweet, Salty, and Crunchy Goodness
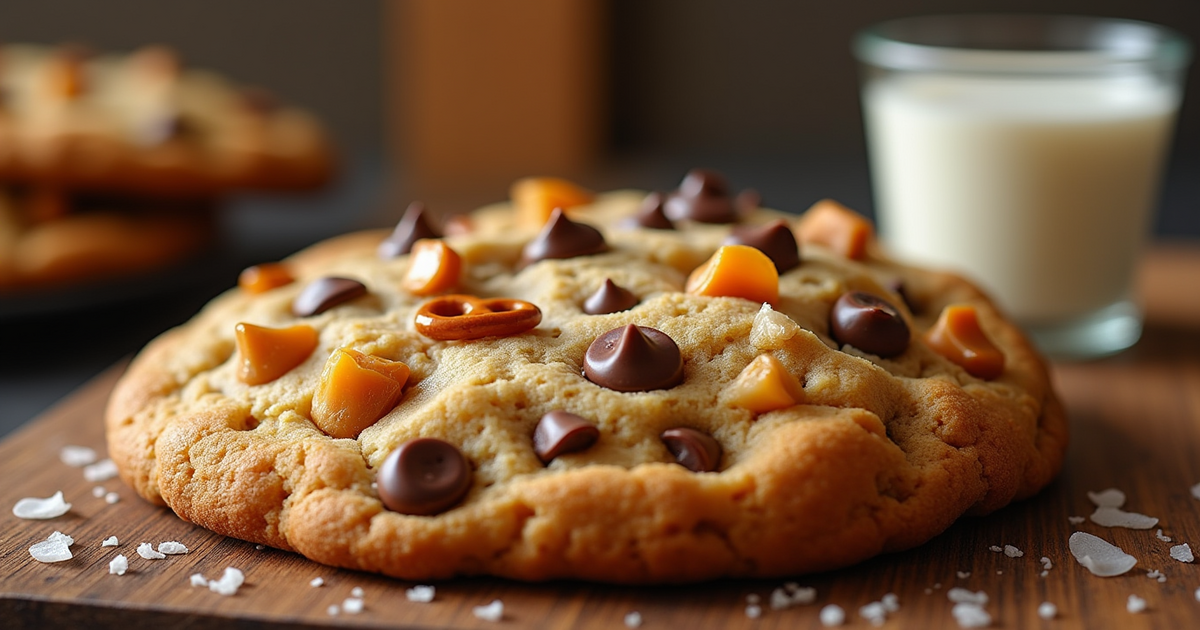
One bite into a Kitchen Sink Crumbl Cookie and it’s easy to see why these treats have such a loyal following. The flavor experience is dynamic — not just sweet, but a beautiful balance of sweet, salty, buttery, and slightly savory elements. Rich chocolate chips provide that familiar, comforting sweetness, while buttery toffee bits add a deep caramel flavor that feels luxurious on the palate.
Pretzel pieces bring the crunch and a pop of saltiness that enhances every other ingredient. Finally, a sprinkle of flaky sea salt finishes it all off, elevating the cookie from delicious to downright irresistible.
Each bite offers a little something different: gooey chocolate here, a salty crunch there, a toffee meltaway moment in between. It’s this playful contrast of flavors and textures that keeps you reaching for just one more bite — and one more after that.
Oversized, Bakery-Style Cookies That Feel Extra Special
Size matters — especially when it comes to cookies! One of the standout features of the Kitchen Sink Crumbl Cookie is its impressive, bakery-style size. These cookies are thick, hefty, and meant to make a statement. Unlike standard homemade cookies that might be two or three bites, these are substantial enough to satisfy even the most serious cookie lover.
The larger size also serves a functional purpose: it allows for a softer, doughier center while the edges turn golden and lightly crisp. This perfect textural contrast is part of what makes bakery cookies so special — and now, you can achieve that same professional result at home.
There’s something inherently joyful about baking (and eating!) an oversized cookie packed with treats. It feels like a celebration, even if it’s just a regular afternoon snack. Plus, sharing these generously-sized cookies with family and friends only adds to the experience — making homemade feel just as exciting as a trip to Crumbl.
An “Anything Goes” Cookie That Invites Creativity
One of the most magical things about the Kitchen Sink Crumbl Cookie is the freedom it gives bakers to get creative. True to its name, this cookie embraces the “everything but the kitchen sink” philosophy, meaning you can toss in almost any combination of goodies you love.
Stick to the classic add-ins like chocolate chips, pretzels, and toffee bits — or venture into bold territory with peanut butter cups, marshmallows, white chocolate chunks, caramel drizzle, crushed potato chips, or even your favorite candies. There are no limits, only delicious possibilities.
This adaptability makes baking kitchen sink cookies not just a recipe, but an experience. It’s an opportunity to personalize every batch based on your cravings or whatever mix-ins you have in the pantry. Plus, it’s a fantastic way to get kids involved in the kitchen — they’ll love choosing their own wild combinations!
Every time you bake these cookies, you’re creating something unique, and that personal touch makes them even more satisfying to enjoy.
Essential Ingredients for Perfect Homemade Crumbl Cookies
High-Quality Butter: The Foundation of Rich, Chewy Cookies
When it comes to baking the perfect Kitchen Sink Crumbl Cookie, butter isn’t just an ingredient — it’s the heart of the cookie. Using high-quality, full-fat butter ensures a rich, creamy flavor and that melt-in-your-mouth texture everyone loves. Opt for unsalted butter to better control the saltiness of your dough, and make sure it’s softened (not melted) for the best creaming results.
Creaming butter with brown sugar creates tiny air pockets in the dough, giving the cookies lift and softness while keeping them deliciously dense. For an even deeper flavor, you can experiment with browning the butter slightly before incorporating it, which adds a subtle nutty richness that complements the salty-sweet mix-ins beautifully. Remember, great cookies start with great butter!
The Power of Brown Sugar and Vanilla Extract for Depth of Flavor
If you want your homemade Crumbl cookies to taste like they came straight from the bakery, brown sugar is non-negotiable. Unlike white sugar, brown sugar contains molasses, which brings moisture, chewiness, and a warm, caramel-like flavor to the cookie base. Using a higher ratio of brown sugar to white sugar ensures your cookies stay soft and rich long after they cool.
Pair that with a high-quality pure vanilla extract, and you’ve set the stage for an unforgettable cookie. Vanilla enhances all the other flavors in the dough, making the chocolate, toffee, and pretzels pop with even more intensity. Avoid imitation vanilla, and invest in pure extract — you’ll taste the difference in every bite. These two simple ingredients work together to build the complex, bakery-style flavor you’re aiming for.
Perfect Leavening and Mix-Ins: Achieving That Signature Crumbl Texture
Getting the texture right is one of the hallmarks of a successful Kitchen Sink Crumbl Cookie, and it all starts with your leavening agents. A precise blend of baking soda and baking powder ensures the cookies spread just enough without going flat, and keeps the centers thick and tender while the edges crisp up slightly.
Beyond the basics, the real fun begins with the mix-ins. Chocolate chips, pretzels, and toffee bits are the classic trio, but don’t be afraid to get creative. The key is balancing sweet and salty elements for maximum flavor and keeping your add-ins roughly uniform in size for even distribution.
To ensure bakery-quality results, gently fold your mix-ins into the dough rather than overmixing. This technique keeps the dough tender and guarantees that every bite is packed with texture and flavor. When you get the leavening and mix-ins just right, you create a cookie that’s thick, soft, chewy, and absolutely packed with irresistible surprises.
7 Outstanding Tips for Bakery-Quality Kitchen Sink Crumbl Cookies
Use a Stand Mixer for a Perfectly Creamed Butter-Sugar Base
A stand mixer isn’t just a luxury — it’s a secret weapon for achieving that ultra-smooth, fluffy butter-sugar base essential to bakery-quality cookies. Creaming the butter and sugars together introduces tiny air pockets into the dough, helping the cookies bake up thick, tender, and light.
Using a stand mixer ensures the butter and sugars are fully blended without overworking the dough later. If you don’t have a stand mixer, a good handheld electric mixer works too, but be sure to beat the butter and sugar for several minutes until pale and creamy. This foundational step sets the stage for perfect cookie texture!
Chill the Dough for Thicker, Chewier Cookies
One of the most important secrets to getting that signature Crumbl thickness? Chilling the dough. Letting your cookie dough rest in the refrigerator for at least an hour (or even overnight) helps the butter firm up, so the cookies spread less in the oven. Chilled dough also allows the flavors to deepen and develop a richer taste. If you’re short on time, even a quick 30-minute chill can make a noticeable difference. Trust the process — a little patience results in a cookie that’s thicker, chewier, and bursting with all those delicious mix-ins.
Always Use Parchment Paper for Even Baking
Don’t skip lining your baking sheets! Using parchment paper ensures that your Kitchen Sink Crumbl Cookies bake evenly and release effortlessly from the pan without over-browning the bottoms. Unlike greased pans, which can encourage too much spreading, parchment provides just the right amount of grip to help the cookies maintain their beautiful, thick shape. Plus, it makes cleanup a breeze. For the best results, use light-colored baking sheets lined with parchment to avoid excessive browning or uneven baking.
Press Extra Mix-Ins on Top Before Baking for a Bakery-Worthy Look
One simple trick that makes homemade cookies look like they came from a professional bakery? Gently pressing a few extra mix-ins — like chocolate chips, pretzel pieces, or toffee bits — right onto the tops of your cookie dough balls before baking. Not only does this ensure every bite is loaded with goodies, but it also makes the cookies visually stunning, showcasing all the irresistible flavors packed inside. This easy step creates that classic Crumbl cookie appearance that’s so drool-worthy.
Measure Your Flour Properly to Avoid Dense Cookies
Too much flour can turn your dreamy Kitchen Sink cookies into dense, dry disappointments. Always spoon your flour into the measuring cup and level it off with a knife instead of scooping it directly from the bag, which can compact the flour and add more than needed. Better yet, use a kitchen scale for the most accurate measurement. Getting the flour amount just right helps create that soft, tender crumb that makes Crumbl cookies so unforgettable — light, chewy, and rich without being heavy.
Slightly Underbake for Soft, Gooey Centers
For that perfect bakery-style texture — thick, tender, and slightly gooey — it’s important to slightly underbake your cookies. Remove them from the oven when the edges are just beginning to turn golden but the centers still look a little soft and underdone. As they cool on the baking sheet, they’ll continue to cook and set up beautifully. This technique guarantees cookies that are melt-in-your-mouth soft in the center while still maintaining enough structure to hold together.
Cool Completely on a Wire Rack for the Best Texture
Once out of the oven, let your cookies sit on the baking sheet for a few minutes to firm up before transferring them to a wire cooling rack. This allows them to finish setting without becoming overcooked. Cooling on a rack promotes airflow around the entire cookie, preventing soggy bottoms and helping maintain that irresistible balance between a crisp exterior and a soft, chewy center. As tempting as it is to dig in right away, allowing your cookies to cool properly results in the absolute best flavor and texture.
Common Mistakes to Avoid When Making Copycat Crumbl Cookies
Overmixing the Dough, Leading to Tough Cookies
It’s tempting to keep the mixer running, especially when you’re eager to combine all your ingredients quickly. But overmixing is one of the fastest ways to ruin the tender, chewy texture you want in a Kitchen Sink Crumbl Cookie. Overworking the dough develops too much gluten in the flour, leading to dense, tough cookies instead of soft, bakery-style ones.
Once you add the dry ingredients, mix just until the flour disappears — no more. Then, gently fold in your mix-ins by hand. This simple habit preserves the light, tender crumb that makes these cookies so incredibly satisfying to bite into.
Skipping the Dough Chilling Step
We get it — the aroma of cookie dough is irresistible, and the urge to pop those cookies straight into the oven is strong. But skipping the chilling step is a big mistake! Chilling the dough allows the butter to firm up and the flavors to meld beautifully. Without this rest time, the cookies can spread too much, turn out flat, and lose that signature thick, chewy texture that Crumbl is known for.
Even a quick 30-minute chill can dramatically improve your results. Ideally, overnight chilling creates cookies that hold their shape better, bake up thicker, and taste even richer. Patience really does pay off when it comes to bakery-quality cookies!
Using Low-Quality Ingredients That Affect Flavor and Texture
When you’re aiming for bakery-quality Kitchen Sink Crumbl Cookies, the quality of your ingredients matters — a lot. Using low-grade butter, chocolate, or vanilla can lead to cookies that taste flat, greasy, or overly sweet without depth. High-quality butter brings a richer flavor, premium chocolate melts more smoothly, and pure vanilla extract adds warmth and complexity.
Whenever possible, choose real, wholesome ingredients. They make a noticeable difference not just in flavor, but in how beautifully your cookies bake and how satisfying they are to eat. Remember, exceptional cookies start with exceptional ingredients!
Overbaking the Cookies and Losing That Soft Center
It’s easy to think you need to bake cookies until they look completely firm and golden in the oven — but when it comes to Crumbl-style cookies, that’s a mistake! These cookies should be slightly underbaked to maintain their soft, gooey centers. If you leave them in the oven until they look fully set, they’ll overcook as they cool, becoming dry and crumbly.
The key is to remove the cookies when the edges are lightly golden but the centers still look soft and slightly underdone. They will continue baking from the residual heat of the tray, resulting in that luscious, tender center Crumbl cookies are famous for.
Final Thoughts: Mastering the Art of Kitchen Sink Crumbl Cookies
Don’t Be Afraid to Experiment with Mix-Ins
One of the most exciting aspects of the Kitchen Sink Crumbl Cookie is its versatility. While the classic combination of chocolate chips, pretzels, and toffee bits is a winner, don’t hesitate to mix things up based on your preferences or what you have on hand. The beauty of this cookie lies in its “anything goes” philosophy — so feel free to play with different chocolate types (dark, milk, white), throw in crushed candy bars, or even try unconventional ingredients like marshmallows or caramel swirls.
Experimenting with mix-ins not only makes each batch uniquely yours, but it’s also a fun way to discover new flavor combinations. Whether you’re making cookies for yourself or baking for family and friends, personalizing these cookies ensures they’re always a hit!
Focus on Technique for Consistent Results
Baking Kitchen Sink Crumbl Cookies is as much about technique as it is about the ingredients. By mastering key techniques — like proper dough chilling, precise mixing, and knowing when to pull them out of the oven — you’ll be able to consistently bake perfect cookies every time. For instance, using a cookie scoop ensures that each cookie is uniform in size, so they all bake evenly.
Additionally, practicing small details like pressing extra mix-ins on top before baking, or paying attention to the temperature of your dough, will elevate your baking game to the next level. Mastering these techniques doesn’t just improve the cookies, it makes baking an enjoyable, repeatable experience.
Don’t Rush the Process — Patience Equals Perfection
As tempting as it may be to dive right into the baking process, don’t rush the steps that guarantee bakery-quality results. Chilling the dough, letting the cookies cool properly on a wire rack, and ensuring you underbake just enough for a soft, gooey center are all crucial to achieving the perfect Kitchen Sink Crumbl Cookie.
Patience is your secret ingredient. Taking time to properly chill the dough and letting the cookies set on the baking sheet before transferring them to a rack helps you achieve the ideal balance of texture and flavor. When you give the dough and the cookies themselves a little extra time to shine, the results will truly speak for themselves.
Enjoy the Process and Share the Joy
Baking cookies should be a fun, rewarding experience, and making Kitchen Sink Crumbl Cookies is no exception. Whether you’re baking solo, with friends, or involving little ones in the kitchen, it’s a wonderful way to spend time and create something special. Sharing your creations with family, friends, or coworkers adds another layer of enjoyment to the whole process.
Not only will the cookies taste incredible, but the joy of sharing them — and seeing the smiles on people’s faces when they bite into that gooey, chewy perfection — is an experience worth savoring. So, take your time, enjoy the journey, and don’t forget to share the love (and cookies) along the way!
FAQ Section (If You Want a Bonus SEO Boost)
Can I Use Other Types of Sugar for My Kitchen Sink Crumbl Cookies?
While brown sugar is the star of the show in the classic Kitchen Sink Crumbl Cookie, it’s understandable if you’re curious about experimenting with different types of sugar. The short answer is yes — you can use white sugar or turbinado sugar as alternatives, but it will affect the flavor and texture of your cookies.
White sugar will give your cookies a slightly crisper texture and less caramelized flavor compared to brown sugar, while turbinado sugar will provide a bit of extra crunch due to its larger crystals. If you’re aiming for that classic soft, chewy texture, stick with a blend of brown sugar (preferably light brown) for the best results. But feel free to get creative — experimenting with different sugars is part of the fun of baking!
Can I Make These Cookies Gluten-Free or Dairy-Free?
Yes, you can! Making gluten-free or dairy-free Kitchen Sink Crumbl Cookies is totally possible without sacrificing flavor or texture. To make them gluten-free, simply swap out the regular flour for a high-quality gluten-free all-purpose flour blend. Look for a blend with xanthan gum, which helps provide structure and moisture. For the dairy-free version, substitute the butter with a plant-based option, such as vegan butter or coconut oil.
You can also swap regular chocolate chips with dairy-free options, and for a nut-free variation, consider adding crunchy seeds or coconut flakes instead of nuts. These substitutions will help you maintain the rich, chewy texture that makes these cookies irresistible, all while accommodating dietary restrictions. Don’t hesitate to adjust the recipe based on your needs — these cookies are incredibly adaptable!
How Can I Store Leftover Kitchen Sink Crumbl Cookies?
If you’re lucky enough to have leftover Kitchen Sink Crumbl Cookies (they don’t always last long!), proper storage is key to keeping them fresh and delicious. For the best results, store your cookies in an airtight container at room temperature, where they will stay soft and chewy for up to 4–5 days.
If you want to keep them for longer, you can freeze them! Simply place the cookies in a freezer-safe container or Ziploc bag with parchment paper between layers, and freeze for up to 3 months. To enjoy, let them thaw at room temperature or warm them in the microwave for 10–15 seconds for that fresh-from-the-oven feel. Whether at room temp or frozen, these cookies maintain their flavor and texture beautifully, so you’ll have a treat ready whenever the craving strikes.
Can I Make the Dough Ahead of Time?
Absolutely! In fact, making Kitchen Sink Crumbl Cookie dough ahead of time is a great way to save time and ensure you have fresh cookies ready when you need them. After preparing the dough, simply wrap it tightly in plastic wrap or place it in an airtight container and refrigerate it for up to 3 days. Chilling the dough also enhances the flavor and makes the cookies even thicker and chewier once baked.
For even longer storage, you can scoop out dough balls and freeze them. Once frozen solid, transfer the dough balls to a freezer-safe bag, and they’ll keep for up to 3 months. When you’re ready to bake, just place the frozen dough balls on a baking sheet and bake for an extra minute or two. This is an excellent option if you want fresh cookies with minimal effort!